Having the bigger reservoirs mean that I had to spread them out a bit further which reduced the clearance between the front reservoir and the chassis member and I couldn't get the front hose into position with the fittings that I had. I pulled the reservoirs complete with mounting plate off the car and run down to the company that supplied the fittings and after a quick rat around we had the correct 45° fitting. You will notice this fitting in the above pic.
Once the reservoirs were in I ran the hoses down to the master cylinders and checked the alignment making sure that there were no areas of the hoses fouling up. I made up a simple bracket to separate the hoses out of 30mm x 1mm aluminium angle with three grommets for the hoses and it just works and looks a treat. I would like to say that I developed the bracket but a good friend made one to suit his car and I just copied it, we call it the Darryl Bracket and it has become quite popular with builders, now I'm not saying that he never swiped it from somewhere else but he gets the credit. I am going to put a similar separator up at the top so the hoses don't rub on each other. There is no contact with metal anywhere.
It was time to put the dash together as I had all the bits including the dash fascia and gauges. The dash fascia was made from 3mm moulded plastic and came with the dash impression in a large sheet of high impact plastic which I cut out using a band saw and coping saw for the tight areas. While a lot of filing and shaping was required it came up very well.
Setting the dash up in the correct position is a bit of a trick and not having the body on the car leaves it up to a bit of guess work. First thing to do was to fit the adjustable brackets that will hold the ends of the dash and fit them at an angle facing the driver.
Having placed the brackets in the appropriate place (some guess work required) the hole for the steering column had to be drilled and the question is, just where do you drill it. I aligned the dash central to the brackets and scribed a line directly up from the column
The scribed line being central with the brackets is obviously the place to start. There is quite a bit of vertical adjustment in the steering column but no lateral adjustment so if the centre line is correct, based on the brackets you have a good chance of bunging the column hole in the right spot. I decided to drill a 40mm hole that would exit marginally above the folded area at the bottom of the dash and go from there.
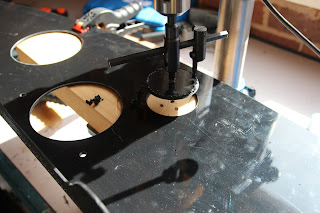
Once the column hole is drilled and the dash fitted over the column, you have a good idea as to where to go next. I found that to allow the indicator stalk to sit into the dash and to also lower the dash, I had to provide a 70mm hole so using the bottom of the existing 40mm hole I just moved the hole centre up an additional 15mm and drilled the 70mm hole. I used a special tool for this which you will see in the pics. An aluminium backing template is provides with the dash to allow easy marking of the gauge holes so it is only a matter of aligning the column hole and the rest is straight forward.


No comments:
Post a Comment